Drone and Photography Guide
Thinking about getting into drone photography? It’s a pretty cool way to see the world from a new angle. This guide will walk you through everything, from picking out the right drone to getting those amazing shots, even in special places like the photography hill of Tara. We’ll cover some basic stuff and also some more advanced tips to help you take your pictures to the next level.
Key Takeaways
- Picking the right drone means looking at its camera, how long it flies, and if it’s easy to carry around.
- Good drone pictures come from knowing how to set up your shots, using different flight modes, and understanding light.
- After you take your pictures, you can make them look even better with some editing, like fixing colors or making panoramas.
- Flying a drone means following rules about where you can fly, respecting people’s privacy, and knowing about no-fly zones.
- Places like the Hill of Tara need extra care when flying a drone; you have to be mindful of its history and any special rules.
Choosing the Right Drone for Photography
So, you want to get into drone photography? Awesome! The first step is picking the right drone. It can be a bit overwhelming with all the options out there, but don’t worry, we’ll break it down. Think about what kind of photos you want to take and where you’ll be flying. That’ll help narrow things down a lot.
Understanding Camera Specifications
The camera is arguably the most important part of a photography drone. You’ll want to pay attention to a few key specs:
- Sensor Size: Bigger is generally better. A larger sensor captures more light, which means better image quality, especially in low light. Think about it like this: a bigger bucket catches more rain.
- Megapixels: This determines the resolution of your photos. More megapixels mean you can crop and zoom without losing too much detail. Most modern drones have enough megapixels for good-sized prints.
- Aperture: This controls how much light enters the camera. A wider aperture (lower f-number like f/2.8) is better for low-light situations and creating a shallow depth of field. A smaller aperture (higher f-number like f/8) is good for landscapes where you want everything in focus.
- Video Resolution and Frame Rate: If you plan on shooting video, check the resolution (4K is pretty standard now) and frame rate (30fps or 60fps for smoother motion).
Don’t get too caught up in the numbers game. Sometimes, a drone with slightly lower specs but better image processing can produce better results than one with impressive specs on paper.
Battery Life and Flight Time Considerations
Battery life is a big deal. No one wants their drone to fall out of the sky mid-shot. Longer flight times give you more opportunities to get the perfect angle and composition. Here’s what to consider:
- Typical Flight Time: Check the manufacturer’s specs, but remember that real-world flight times are often shorter due to wind, temperature, and flying style. Expect to get around 70-80% of the advertised flight time.
- Battery Capacity: Higher capacity batteries generally mean longer flight times, but they also add weight.
- Number of Batteries: It’s always a good idea to have extra batteries on hand. Trust me, you’ll be glad you did.
Here’s a quick comparison of some popular drones and their approximate flight times:
| Drone Model | Approximate Flight Time | Battery Capacity |
|---|---|---|
| DJI Mavic Air 3 | 46 minutes | 4241 mAh |
| Autel Evo Lite+ | 40 minutes | 6175 mAh |
| DJI Mini 3 Pro | 34 minutes | 2453 mAh |
Portability and Durability Factors
You’ll probably be carrying your drone around a lot, so portability is important. Also, let’s face it, crashes happen. Durability is something to think about. Here’s the lowdown:
- Size and Weight: Smaller, lighter drones are easier to pack and carry. Foldable drones are especially convenient.
- Build Quality: Look for drones made from sturdy materials that can withstand a few bumps and scrapes. Some drones have obstacle avoidance systems, which can help prevent crashes.
- Gimbal Protection: The gimbal is what keeps your camera stable, so make sure it’s well-protected. A damaged gimbal can ruin your footage. Consider virtual tours to scout locations beforehand.
- Spare Parts Availability: It’s good to know that you can easily get spare parts like propellers if something breaks. Some manufacturers offer repair services as well.
Essential Drone Photography Techniques
Okay, so you’ve got your drone, you’ve got your camera, now what? Just flying around and snapping pics isn’t going to cut it. You need some actual technique to get those killer shots. It’s like, anyone can buy a guitar, but not everyone can shred like a rockstar, right?
Mastering Aerial Composition
Composition is everything, even from the sky. Think about it: you’re presenting a whole new perspective, so you need to guide the viewer’s eye. It’s not just about pointing and shooting.
- Use the rule of thirds. Seriously, it works. Imagine your screen divided into nine equal parts by two horizontal and two vertical lines. Place key elements along those lines or at the intersections. It creates balance and interest.
- Look for leading lines. Roads, rivers, fences – anything that draws the eye into the scene. They add depth and direction.
- Consider symmetry and patterns. Aerial views are perfect for spotting repeating shapes or symmetrical arrangements. Exploit them!
Don’t be afraid to experiment with different angles and perspectives. Sometimes, tilting the camera slightly or flying at a different altitude can make all the difference. It’s about finding that sweet spot where everything comes together.
Utilizing Different Flight Modes
Drones have all sorts of fancy flight modes these days, and they’re not just for show. They can actually help you get better photos. I mean, who doesn’t love a good flight mode?
- Tripod Mode: Slows everything down for smooth, stable shots. Perfect for capturing video or stills in tight spaces.
- ActiveTrack: Lets you lock onto a subject and have the drone follow it automatically. Great for action shots or tracking moving objects.
- Point of Interest (POI): Allows the drone to circle a specific point, keeping the camera focused on it. Ideal for showcasing landmarks or creating dynamic videos.
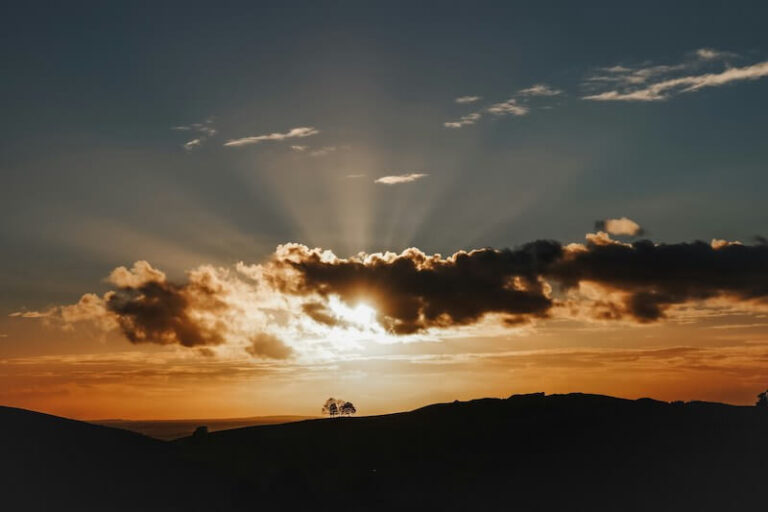
Achieving Optimal Lighting Conditions
Lighting is king, whether you’re on the ground or in the air. Understanding how light affects your images is key to getting stunning results. It’s all about timing and knowing when to fly.
- Golden Hour: The hour after sunrise and the hour before sunset. The light is soft, warm, and flattering. It’s the photographer’s best friend.
- Blue Hour: The period just before sunrise and after sunset. The sky takes on a deep blue hue, creating a moody and atmospheric effect.
- Avoid midday sun: The light is harsh and creates strong shadows. If you have to shoot during the day, try to find some shade or use a polarizing filter. Speaking of filters, you might want to look into polarizing filters for your drone camera.
| Time of Day | Light Quality | Best For | Considerations |
|---|---|---|---|
| Golden Hour | Soft, warm | Landscapes, portraits | Arrive early to scout locations |
| Blue Hour | Cool, moody | Cityscapes, night scenes | Use a tripod for long exposures |
| Midday | Harsh, bright | (Avoid if possible) | Use a polarizing filter, find shade |
Post-Processing for Drone Images
Okay, so you’ve got some awesome aerial shots. Now what? Post-processing is where you really make those images shine. It’s not just about slapping on a filter; it’s about refining your work to get the best possible results. Think of it as the final step in turning a good photo into a great one. I’ve found that even a little bit of editing can make a huge difference, especially with drone photography where you’re often dealing with tricky lighting and atmospheric conditions.
Color Correction and Grading
Color correction is all about fixing any issues with the colors in your image. Maybe the white balance is off, or the colors look a bit dull. This is where you adjust things like temperature, tint, and exposure to get everything looking natural and balanced. Color grading, on the other hand, is more about creating a specific mood or style. You might want to give your image a warm, vintage feel, or a cool, cinematic look. It’s all about personal preference and what you’re trying to convey with your photo. I usually start with color correction and then move on to grading once I’m happy with the base colors. There are many self-guided tours available to learn more about this topic.
Sharpening and Noise Reduction
Drone cameras, especially on smaller models, can sometimes produce images that are a bit soft or noisy. Sharpening helps to bring out the details and make your image look crisper. But be careful not to overdo it, as too much sharpening can create unwanted artifacts. Noise reduction is used to smooth out any graininess or noise in your image. Again, it’s a balancing act. Too much noise reduction can make your image look blurry and unnatural. I usually start with a subtle amount of sharpening and then apply noise reduction as needed.
Stitching Panoramas and Vertoramas
One of the coolest things you can do with a drone is create panoramic or vertorama images. Panoramas are wide, horizontal images that capture a large field of view, while vertoramas are tall, vertical images that are great for showcasing landscapes with a lot of height. To create these, you need to take multiple overlapping photos and then stitch them together using software like Adobe Photoshop or PTGui. It can be a bit tricky to get the hang of, but the results are definitely worth it.
Post-processing is a skill that takes time and practice to develop. Don’t be afraid to experiment with different techniques and find what works best for you. There are tons of tutorials and resources available online, so take advantage of them. The more you practice, the better you’ll become at bringing out the best in your drone photos.
Legal and Ethical Drone Operation
Flying drones isn’t just about getting cool shots; there are rules and responsibilities you need to know. It’s easy to get caught up in the excitement, but ignoring the legal and ethical aspects can lead to serious trouble. Think fines, legal issues, or even endangering others. So, before you send your drone soaring, let’s cover some important points.
Navigating Airspace Regulations
Airspace is divided into different zones, each with its own set of rules. You can’t just fly anywhere you want. Understanding these regulations is key to avoiding violations. For example, near airports, there are often strict limitations on drone flights. Check local regulations before each flight. Apps like B4UFLY can help you determine if it’s safe and legal to fly in a specific area. It’s also a good idea to register your drone with the relevant aviation authority, like the FAA in the United States. This makes it easier for authorities to identify you if something goes wrong.
Respecting Privacy and Property Rights
Just because you can fly over someone’s property doesn’t mean you should. People have a right to privacy, and constantly hovering a drone over their backyard isn’t cool. Be mindful of where you’re flying and who might be affected. Avoid recording people without their knowledge or consent. If you’re planning to fly over private property, it’s always best to ask for permission first. This shows respect and can prevent misunderstandings. Remember, ethical drone operation is about being considerate of others.
Understanding No-Fly Zones
No-fly zones are areas where drone flights are prohibited for safety or security reasons. These zones often include airports, military bases, prisons, and critical infrastructure. Flying in these areas can result in hefty fines and legal penalties. Always check for no-fly zones before each flight. Many drone apps have built-in maps that show these restricted areas. It’s also important to be aware of temporary flight restrictions (TFRs), which can be put in place for special events or emergencies. Ignoring these restrictions can have serious consequences. If you need a chauffeur service to get to a safe location to fly your drone, consider booking in advance.
Operating a drone responsibly means staying informed about the rules, respecting people’s privacy, and prioritizing safety. It’s not just about getting the shot; it’s about being a responsible member of the drone community.
Here’s a quick checklist to keep in mind:
- Check airspace regulations before each flight.
- Respect privacy and property rights.
- Be aware of no-fly zones and temporary flight restrictions.
- Register your drone with the appropriate authority.
- Fly safely and responsibly.
Advanced Drone Photography Applications
So, you’ve got the basics down. Now it’s time to push your drone photography skills further. There’s a lot more you can do than just taking regular photos and videos. Let’s explore some advanced techniques.
Creating 3D Models with Drones
Did you know you can use your drone to create 3D models? It’s pretty cool. Basically, you take a bunch of overlapping photos of a subject from different angles. Then, you use special software to stitch them together into a 3D model. This is used in surveying, construction, and even for creating virtual tours. The key is to maintain consistent overlap between images for accurate reconstruction.
Here’s a quick rundown of the process:
- Plan your flight path to ensure complete coverage.
- Capture images with sufficient overlap (70-80% is a good starting point).
- Use photogrammetry software to process the images.
- Refine the model for accuracy and detail.
Time-Lapse and Hyperlapse Photography
Time-lapse and hyperlapse photography can create some really stunning effects. Time-lapse involves taking photos at set intervals over a long period, then speeding them up into a video. Hyperlapse is similar, but you physically move the drone a small distance between each shot. This creates a dynamic, moving time-lapse. For Newgrange for Families, time-lapse could capture the changing light over the ancient site.
To get good results:
- Use a stable tripod or landing pad for time-lapses.
- Plan your shot carefully, considering the movement of the sun or clouds.
- Use a consistent interval between shots.
- For hyperlapses, move the drone smoothly and precisely between each shot.
Time-lapse and hyperlapse photography require patience and planning. The results, however, can be incredibly rewarding, offering a unique perspective on the passage of time.
Low-Light and Night Drone Imaging
Shooting at night or in low light can be tricky, but it can also produce some amazing images. You’ll need a drone with a good camera and the ability to shoot at high ISOs without too much noise. You’ll also need to understand how to use manual settings to control exposure and focus. Consider using propeller care to ensure smooth flights in challenging conditions.
Here are some tips for low-light drone photography:
- Use a drone with a large sensor and good low-light performance.
- Shoot in manual mode to control exposure and ISO.
- Use a low aperture (f/2.8 or wider) to let in more light.
- Increase the ISO, but be mindful of noise.
- Use image stabilization to reduce blur.
Drone Maintenance and Safety
It’s easy to overlook drone maintenance, but trust me, it’s super important. A little bit of care can save you from a lot of headaches (and crashes) down the road. Think of it like taking care of your car – you wouldn’t just drive it until it breaks down, right? Same goes for your drone. Let’s dive into some key areas.
Pre-Flight Checks and Calibration
Before every flight, run through a checklist. Seriously, every single time. It might seem tedious, but it’s worth it. I’ve almost learned the hard way a few times. Here’s what I usually check:
- Battery levels: Make sure everything is fully charged. Don’t risk it.
- Propellers: Look for cracks or damage. Even a small nick can mess things up.
- Gimbal: Ensure it’s moving freely and not obstructed.
- Calibration: Recalibrate your compass if you’re in a new location. It’s easy to forget, but it can really affect stability.
Proper pre-flight checks are the first line of defense against accidents.
Propeller Care and Replacement
Propellers are your drone’s lifeline. Keep them in good shape, and they’ll keep you in the air. Here’s the deal:
- Inspect regularly: Look for bends, cracks, or chips.
- Clean them: Wipe off any dirt or debris. It can affect performance.
- Replace when needed: Don’t wait until they’re falling apart. If you see any damage, swap them out. It’s cheap insurance.
I had a close call once when a propeller broke mid-flight. Luckily, I was able to land safely, but it was a wake-up call. Now, I always carry spare propellers with me. It’s a small price to pay for peace of mind.
Firmware Updates and Software Management
Keeping your drone’s firmware and software up to date is crucial. These updates often include bug fixes, performance improvements, and new features. Here’s what you need to know:
- Check for updates regularly: Most drone apps will notify you when updates are available.
- Read the release notes: Understand what the update includes before installing it.
- Update in a stable environment: Make sure your drone and device have a stable internet connection and sufficient battery life.
- Calibrate after updating: Sometimes, updates can affect calibration settings. Recalibrate to ensure optimal performance. Regular drone maintenance is key to keeping your equipment in top condition.
Exploring Unique Photographic Locations
Finding cool spots to fly your drone and take pictures is a big part of drone photography. It’s not just about having a good drone; it’s about finding places that offer something special from above. Think about locations that have interesting shapes, colors, or stories to tell. It’s about seeing the world from a different angle and capturing something unique.
Capturing Landscapes from Above
Landscapes look amazing from the air. You can see patterns and details that you’d never notice on the ground. Consider locations with varied terrain, like coastlines, mountains, or deserts.
- Look for leading lines, like rivers or roads, to guide the viewer’s eye.
- Pay attention to the time of day. Sunrise and sunset can create dramatic lighting.
- Experiment with different altitudes to find the best perspective. For example, the DJI Mavic 4 Pro drone is great for capturing Iceland’s river braids.
Documenting Historical Sites
Flying a drone over historical sites can give you a new appreciation for their scale and design. It’s a way to connect with the past and see these places in a way that wasn’t possible before.
- Research the site beforehand to understand its history and significance.
- Be respectful of the site and its surroundings.
- Check for any restrictions on drone flights in the area.
Remember to always prioritize safety and respect local regulations when flying near historical sites. It’s important to preserve these locations for future generations.
Showcasing Architectural Details
Drones can capture architectural details that are hard to see from the ground. Think about the tops of buildings, intricate designs, or the overall shape of a structure. It’s a chance to highlight the artistry and skill that went into creating these buildings.
- Focus on symmetry and patterns.
- Use different angles to show off the building’s features.
- Consider the surrounding environment and how it complements the architecture.
Here’s a simple table showing how altitude can affect the type of architectural shot you can get:
| Altitude | Shot Type | Details Captured |
|---|---|---|
| Low | Close-up | Intricate details, textures |
| Medium | Contextual | Building in relation to surroundings |
| High | Overview | Overall shape and design, urban integration |
Special Considerations for Photography Hill of Tara
Hill of Tara is a really special place, full of history and meaning. But, because of that, there are some things you need to keep in mind when you’re taking photos there with a drone. It’s not like just flying anywhere; you’ve got to be extra careful and respectful.
Navigating Protected Heritage Sites
When you’re dealing with a spot like the Hill of Tara, you’re not just dealing with land; you’re dealing with history. It’s super important to know the rules about flying drones in protected areas. These rules are there to keep the site safe and undisturbed. You should check with local authorities to see what’s allowed before you even think about launching your drone. It’s also a good idea to visit the Interpretive Centre and Exhibits to learn more about the site’s history and significance.
Optimal Times for Aerial Photography
Timing is everything when it comes to getting great shots, especially at a place like this. The light can change how everything looks, and some times are better than others for avoiding crowds. Think about these things:
- Golden Hour: Early morning and late afternoon usually give you the best light. It’s softer and warmer, which can make your photos look amazing.
- Weather: Keep an eye on the forecast. Overcast days can actually be good because they give you even lighting, but you might lose some of the shadows and highlights.
- Crowds: Weekdays are usually less busy than weekends. If you want to avoid people in your shots, try to go when most people are at work or school.
Respecting Archaeological Significance
The Hill of Tara isn’t just a pretty place; it’s a place with a lot of history and cultural importance. When you’re flying your drone, you need to be aware of that. Don’t fly too low or too close to any of the monuments or structures. You don’t want to accidentally damage anything or disturb the site in any way. Remember, you’re a guest there, and you should act like one. Think about the impact your drone could have on the area and try to minimize it as much as possible. This includes noise pollution; keep your drone as quiet as possible. Also, be mindful of where you’re landing and taking off. Choose a spot that won’t damage the ground or disturb any wildlife.
Thinking about snapping some pictures at the Hill of Tara? It’s a super special spot, and there are a few things you should know to get the best shots while being respectful. For all the insider tips and tricks on how to make your photos amazing, head over to our website!
Conclusion
So, that’s a lot of information about drones and taking pictures. It’s clear that these tools can really change how we capture things. Getting good at drone photography takes some practice, for sure. You’ll need to learn about the drone itself, how to fly it, and then all the camera settings. But once you get the hang of it, the pictures you can get are pretty amazing. Just remember to keep learning and trying new things. There’s always something new to discover in this area.
Frequently Asked Questions
What kind of drone should I get for taking good photos?
For awesome drone pictures, look for a drone with a good camera, long battery life, and that’s easy to carry around. Think about how clear the pictures will be and how long you can fly it.
How can I take really cool drone pictures?
To get the best drone shots, you need to think about how you set up your picture, use the drone’s different flight modes, and make sure the light is just right. Good light makes a big difference!
What should I do with my drone pictures after I take them?
After you take your drone pictures, you can make them look even better by fixing the colors, making them sharper, and combining several pictures into one big panorama. There are computer programs that help with this.
Are there rules for flying my drone and taking pictures?
It’s super important to know the rules about where you can fly your drone. Always respect people’s privacy and property, and never fly in places where drones are not allowed.
Can drones do other neat things besides just taking photos?
Yes, drones can do more than just take regular pictures! You can use them to make 3D models of things, create cool time-lapse videos, or even take pictures in the dark.
How do I keep my drone working well and safe?
Before you fly, always check your drone to make sure it’s ready. Keep the propellers in good shape, and make sure your drone’s software is always up to date. This helps keep your drone safe and working well.